- 1. Installing GPS Message
- 2. Registering your smartphone
- 3. Setting up your smartphone
- 4. Tracking
- 5. Battery
- 6. Time and Attendance
- 7. Timing In & Out
- 8. Person Down
- 9. Panic Button
- 10. Chat
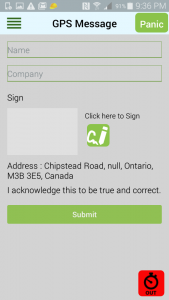
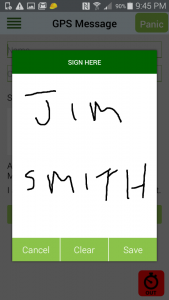
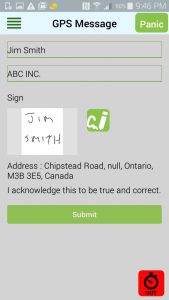
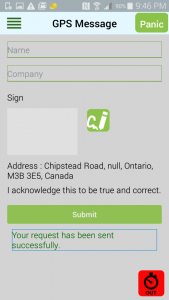
- 11. eSignature
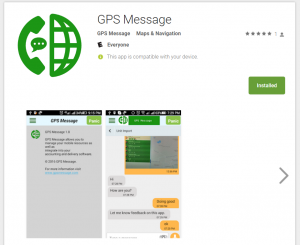
Download & install GPS Message from Google Play oriTunes
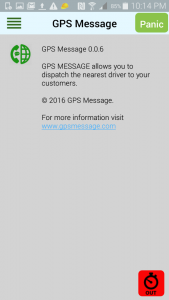
Click on the GPS Message logo on your smartphone

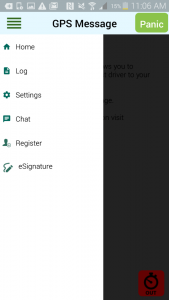
Click on the 4 settings bars(top left)
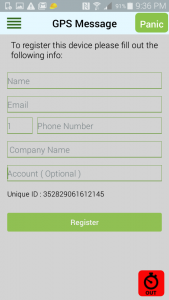
Click on Register
Fill out the form and then click on Register. You will receive a notification once your smartphone has been added to the platform (usually within 4 hours).
Once you have installed GPS Message on the smartphone there are many features that you can take advantage of. Click on the settings bars (top left side of screen).
Then click on the settings tab. This will give you access to the Tracking, Time and Attendance & Person Down functions settings.
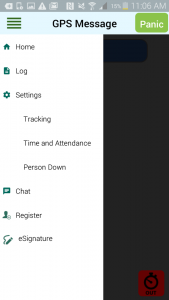
Click on the Tracking tab under settings
Click on the Time interval in seconds which controls how often the smartphone reports in seconds. e.g. 60 seconds 1 minute, 120 seconds 2 minutes… Do not set less than 15 seconds as it will drain the smartphone battery very quickly. The longer the interval the longer the battery life of your smartphone.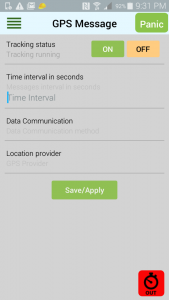
Type the value in seconds for the reporting interval you want the phone to report when it is moving.
By default Data Communication is set to With acknowledgement and does not need to be changed. (without acknowledgement uses less power but is not as reliable)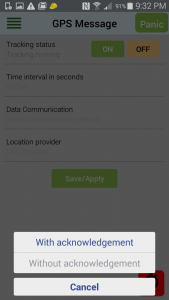
By default Location provider is set to GPS provider and does not need to be changed. (Network provider is not as accurate but uses less power, mixed provider uses a combination of network and GPS to access its location)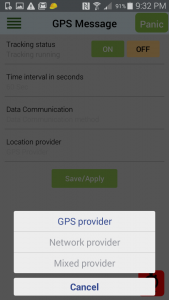
To turn the turn tracking on and off manually click the On button to turn tracking on and the Off button to turn tracking off.
The tab indicated in green is the current status.
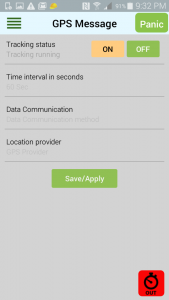
To save your settings click on the save/apply button. This will save your Tracking settings.
GPS Message does require a considerable amount of resources from your smartphone so it is highly recommended to turn off any unnecessary applications that you may be running in the back ground as well as use a car charger to ensure power availability.
Click on the Time and Attendance tab under settings
By selecting Working Hours On, GPS Message will only work when you are ” Timed In”. GPS message is completely turned off when you are “Timed Out” and will not track the phone, allow chat, panic button or person down features. (This is the setting that is commonly used to ensure privacy on the smartphone after hours)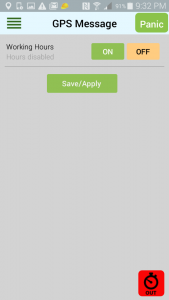
By setting Working Hours to Off, GPS Message will always be on when the smartphone is on.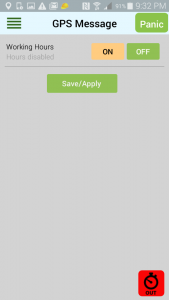
To save your settings click on the save/apply button. This will save your Tracking settings.
To Time in press on the clock symbol which appears at the bottom right of the screen. The symbol displays your current status (Timed In or Out). The Time In/Out symbols are available on all of the pages except the chat page.
To Time In press on the clock symbol when it is red and displays Out. It will start to turn green indicating that it is communicating with the platform.
Once it has successfully Timed In it will display Time in and the clock symbol will turn green.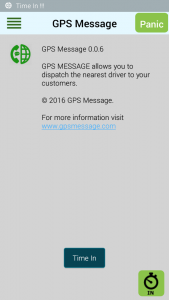
To Time Out press on the clock symbol when it is green and displays In. It will start to turn red indicating that it is communicating with the platform.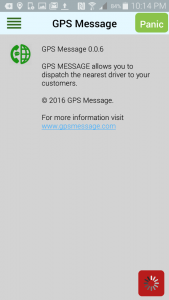
Once it has successfully Timed Out it will display Time Out and the clock symbol will turn red.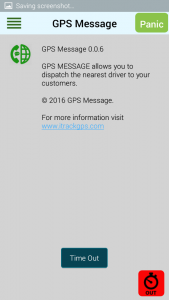
The system always alternates between Time In and Time Out. Should you see that your current status is not correct simply press the clock symbol. The system also remembers your last status before turning off your smartphone and will display it when turned on again.
If you have selected Working Hours then Timing in will turn on the functions of GPS Message and Timing Out will turn off the functions.
By selecting Working Hours On, GPS Message will only work when you are ” Timed In”. GPS message is completely turned off when you are “Timed Out” and will not track the phone, allow chat, panic button or person down features. (This is the setting that is commonly used to ensure privacy on the smartphone after hours)
The Person Down function allows the smartphone to automatically send a message and or initiate a phone call to a pre-programmed number should the smartphone not move for a predefined period of time.
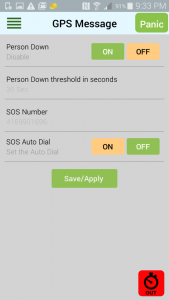
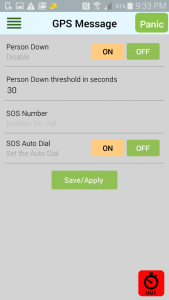
Click on the Person Down tab under settings
Turn the Person Down function on by clicking the On button. Set the Person Down threshold in seconds by typing in a value. e.g. 60 seconds would trigger the alarm should the smartphone not move for 60 seconds. 300 seconds 5 minutes… 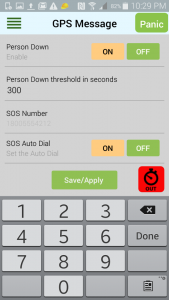
Type in the phone number that you want the smartphone to automatically dial in the SOS Number area. Please ensure to include any country and area code that may be required.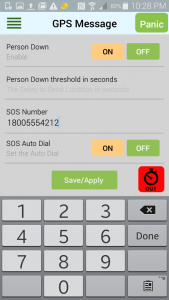
When the SOS Auto Dial is set to On, it will automatically dial the phone number that was programmed. If the SOS Auto Dial is set to Off the smartphone will have a popup button that needs to be manually pressed to initiate a call. When a Person Down event is detected the smartphone sends a person down event to the platform regardless of how the SOS Auto Dial is set.
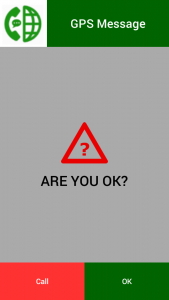
After a Person Down event has happened the operator has 15 seconds to acknowledge that they are ok or the smartphone will automatically dial the pre-programmed number (SOS Auto Dial set to On) or the operator will need to manually press the Call button. (SOS Auto Dial set to Off).
To save your settings click on the save/apply button. This will save your Tracking settings.
The Panic Button appears on the top right hand side of the screen and displays the current status either Panic On or Panic Off.
To initiate a Panic message press the Panic Button when it is green. It will start to turn red indicating that it is communicating with the platform.
Once it has successfully communicated with the platform the Panic symbol will turn red and display Panic On.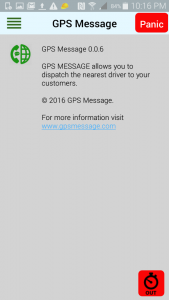
To clear a Panic message press the Panic Button when it is red. It will start to turn green indicating that it is communicating with the platform.
Once it has successfully communicated with the platform the Panic symbol will turn green and display Panic Off.
The Chat feature of GPS Message can be initiated from the platform or the smartphone. To start a chat go to settings and select the Chat tab.
Once you have selected the Chat tab select the user you wish to communicate with. You can also see which users are online based on the green symbol beside their name.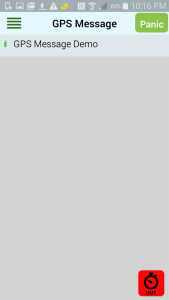
Once you have selected the user that you wish to communicate with the chat box will open up a dialog box displaying any historical messages. You can start chatting with that user.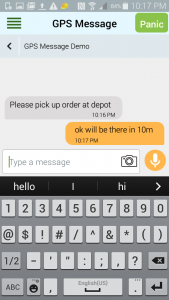
The text that you write is on the right hand side and the response from the platform side user is on the left.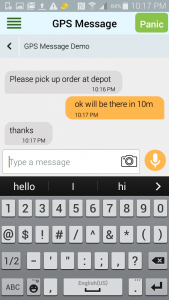
If a user has sent you a chat it will be displayed as a red icon with the number of messages that have been received.
When you press on the Chat tab you will see which users have sent you messages and how many messages are unread. Select the user that you wish to respond to.
The Chat dialog box has the ability to capture and send a picture to the platform or visa versa. To send a picture press the camera icon and select between taking a new picture or one that is already saved on your smartphone. If a user sends you a picture it will be displayed in the dialog box.
If the smartphone is on and the screen is on standby you will receive a sound and or vibration depending on your settings when there is an incoming message. To respond to the message press the GPS Message icon on your smartphone and then go to the Chat area.